|
SolidWorks Tools
 Batch
Print SW (2024)
Download
Buy Now Batch
Print SW (2024)
Download
Buy Now
Batch
Print SW (2023)
Download
Buy Now
Batch
Print SW (2022)
Download
Buy Now
Batch
Print SW (2021)
Download
Buy Now
Batch
Print SW (2020)
Download
Buy Now
Batch
Print SW (2019)
Download
Buy Now
Batch
Print SW (2018)
Download
Buy Now
Batch
Print SW (2017)
Download
Buy Now
Batch
Print SW (2016)
Download
Buy Now
Batch
Print SW (2015)
Download
Buy Now
Batch
Print SW (2014)
Download
Buy Now
Batch
Print SW (2013)
Download
FREE
Batch
Print SW (2012)
Download
FREE
Batch
Print SW (2011)
Download
FREE
Batch
Print SW (2010)
Download
FREE
Batch
Print SW (2009)
Download
FREE
About
Batch Print SW is a comprehensive set of utilities designed to execute repetitive tasks quickly and easily. Printing and converting batches of SolidWorks documents are some of the most popular tasks included in the program.
The program is equipped with a self-explanatory and user friendly interface that preserves user's options for the next time it runs.
It features several modes to select files to work with, notably: drag and drop, loading Excel lists, or searching for files in selected folders.
It is designed to save time and money; an indispensable program to every CAD manager and SolidWorks user.
Try it now by downloading the version that corresponds to your SolidWorks version.
Features and Benefits
- High performance: average print creation speed
14 drawings/min*
- Five efficient modes to select files to be
printed/plotted:
1.
drag and drop files from Windows Explorer,
2. load document list from Excel,
3. search for files in specified folders,
4. print all open documents,
5. print active document only.
- Print using a specified paper size for all
batch or use the paper size
setting last saved in each SolidWorks
document.
- Batch conversion
to CATIA, DWG, DXF, eDrawings, IGES, JPG,
PDF, PDF 3D, STEP, STL and TIF file formats.
- Auto orientation of the drawing (portrait or landscape);
automatically identifies the format of the
drawing and sets the orientation
accordingly.
- User has the option to print the active
sheet, all sheets, or a certain sheet number
of each drawing in the batch.
- Uses a spooler and sends
all print files from the batch together so
that it prevents a mix-up with print files sent from other sources on the
network.
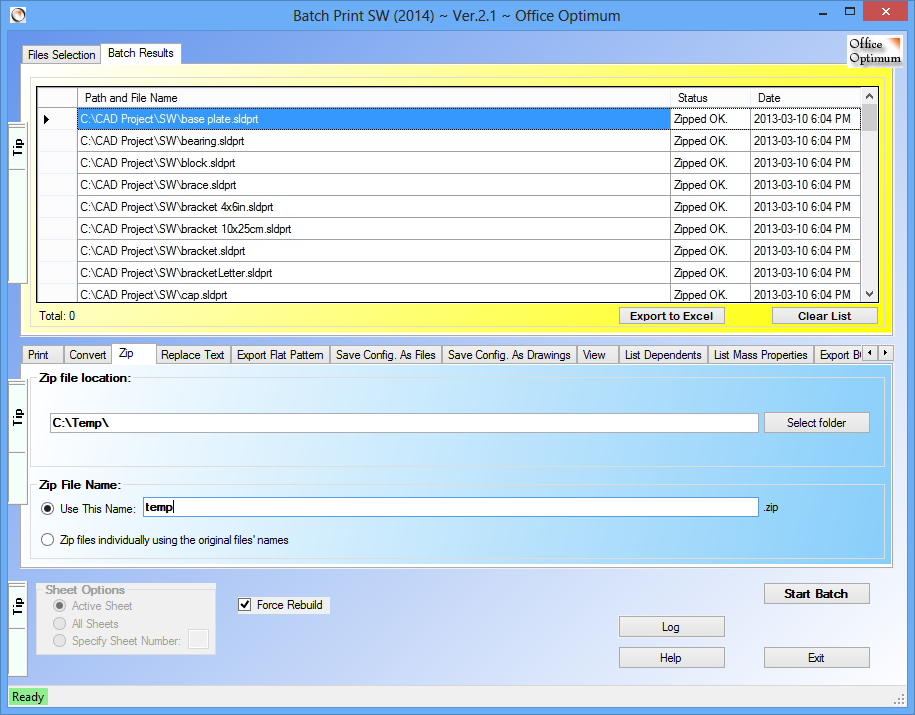
- Zip selected files to group them in a
single file or zip them individually.
- Compatible SolidWorks documents: sldprt, sldasm, slddrw.
- All settings are saved between sessions
Usage
-To use the program, first launch SolidWorks, then launch Batch Print SW by browsing the menu: All Programs, Office Optimum, Batch Print SW.
Then, please
follow these simple instructions describing
each item on Batch Print SW interface:
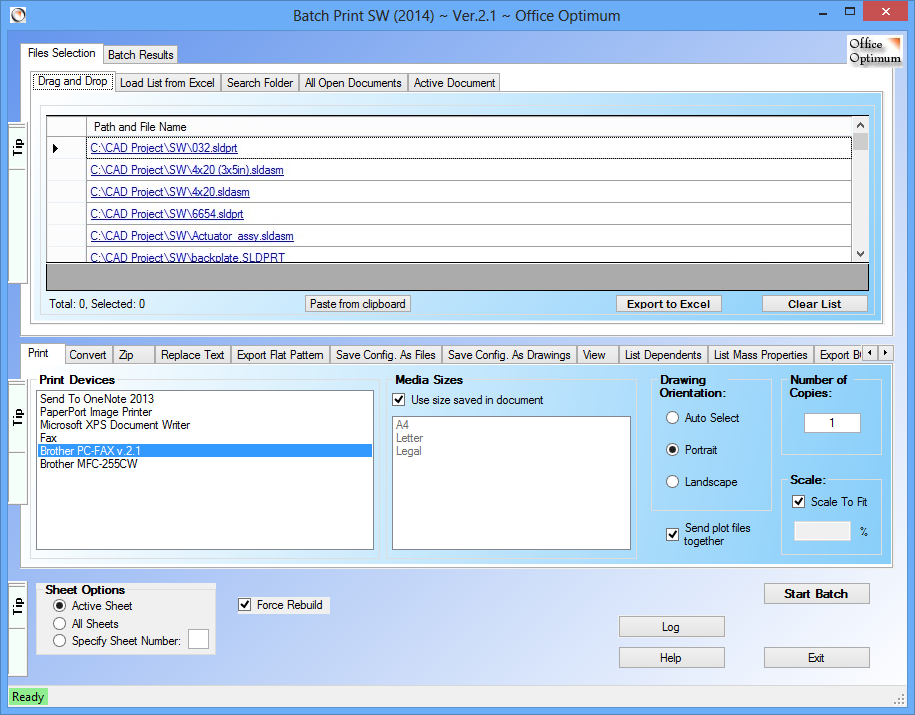
-First, select files to work with in Files Selection tab.
-SolidWorks Files
Selection; there are 5 modes
to select files to be printed, converted or
zipped. Select the
tab corresponding to your needs:
1.Drag and Drop files from Windows Explorer to
the program interface.
If you change your mind, you can double click to remove
some of the files from the list.
Note that if you drag and drop files of
incompatible format they will be skipped
when the batch process starts.
Files can be re-arranged in the list by dragging them, so that the prints come out in the desired order. The list can also be sorted by clicking on the column tab.
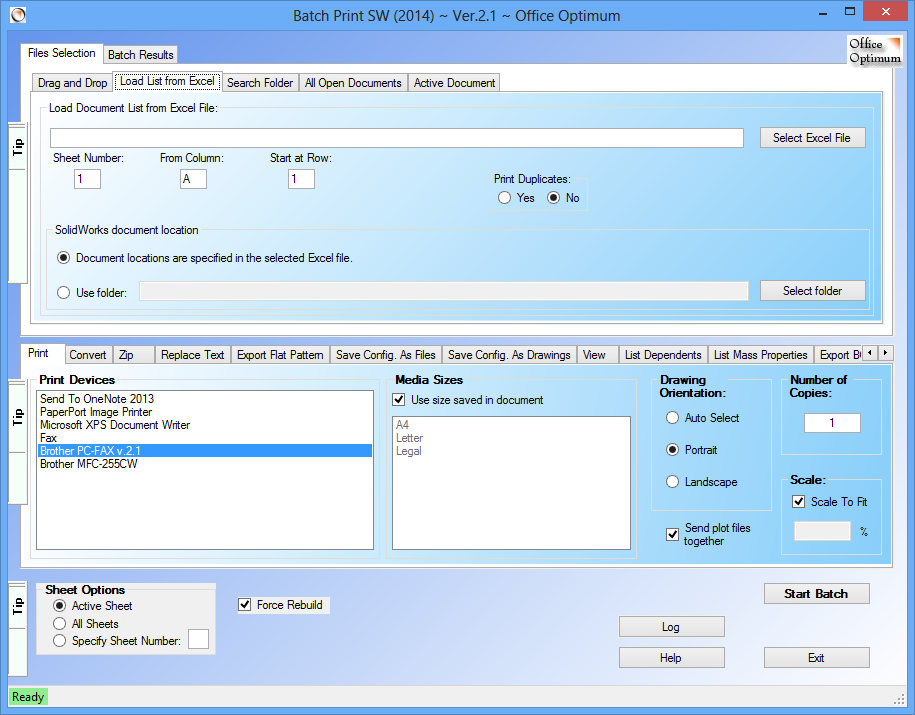
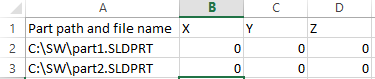
2.Load File List from an Excel file. To
use this mode you first need to have the
SolidWorks document list open in Excel, then to click
Select Excel File button; a window will
pop-up showing all open Excel files. Select
the appropriate Excel file. Next, enter the sheet
number where the list is located in the
Excel file (ex.: enter 1 if the list is in
the first sheet). Specify the column to read
from in the From Column field by
entering the column letter or column number.
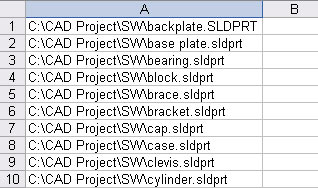
If the paths of the SolidWorks documents are included in the
list, select Document locations are specified
in the selected Excel file option. This
is an example of such list:
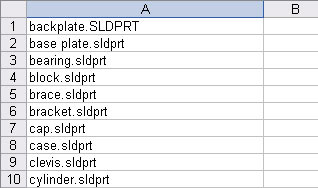
If the paths of the documents are not included in the list,
select Use folder option and click
Select Folder button to browse to the
folder where SolidWorks documents are located.
This is an example of such list:
At the end of the batch process, the cells
in the Excel file will be marked in green
and red; files successfully printed will be
marked in green, files not found in red and
duplicates will be left unchanged.
Your Excel lists may contain duplicate
file names. You can control whether to print
duplicates or not by selecting Yes
or No in the Print Duplicates
menu. 3.Search Folder mode. To use this
mode, first decide if you need to check the
Include SubFolders or not. Then,
click Select folder button and browse
to the folder where SolidWorks documents are located.
The application will search for SolidWorks
documents. All documents found will be listed in the
lower window. You can click Select folder
button again and add other files to the
list. If you wish, you can double click to remove
some of the files from the list.
Files can be re-arranged in the list by dragging them, so that the prints come out in the desired order. The list can also be sorted by clicking on the column tab.
4.All Open Documents mode allows you to process all currently
open SolidWorks document files. You have the option to close
all files when finished (without saving).
5.Active Document mode prints only the active SolidWorks
document.
-Next, select the Drawing Orientation.
The Auto Select option will
automatically select portrait or landscape orientation
according to each drawing format:
-Enter the Number of copies.
-Adjust the Scale if needed.
The scale setting will be applied to all
drawings in the batch.
-Print
Sheet Options allows printing of the
active sheet of each selected document, or
all sheets in each drawing, or of a certain
sheet number of each drawing in the batch.
-Click Start Batch button to start
the batch printing/converting.
The options selected will be applied to all
documents. You can click the Exit/Cancel button to stop a running batch process.
- Confirm each print serves for
pausing the batch process before printing
(or converting) and giving the user the
chance to modify or skip certain
documents from the batch process. When this
check box is on, after opening each drawing,
the user can verify the document, change it,
then decide to print (convert) it or skip it
and go to the next document.
Screenshots
Drag and Drop mode
Load File List mode
Search Folder mode
Batch results example
Note that at startup Batch Print SW will try to find a
running instance of your SolidWorks software. Therefore, you need to first start SolidWorks and then
Batch Print SW.
How Tos
How to batch print SolidWorks documents
Select a plot device from the list of available printers and plotters, and the desired media size; the selected documents will be printed on the same paper size.
Alternatively, check Use size saved in document check box to use the paper size setting last saved in each SolidWorks document.
Select Drawing Orientation, Scale, Number of Copies and Print Sheet Options if necessary. Finally, click the
Start Batch button to start the batch.
When the Send plot files together checkbox is checked, the program uses a spooler to send all print files from the batch together so that it prevents a mix-up with print files sent from other sources on the network.
How to convert batches of SolidWorks documents to other formats
This utility allows the conversion to the following file formats: CATIA, DWG, DXF, eDrawings, IGES, JPG, PDF, PDF 3D, STEP, STL and TIF file formats.
When converting to PDF, you have the option to save sheets to individual PDF and add sheet name as suffix to the new file name. Additionally, you can create 3D pdf files.
How to Replace Text in batches of SolidWorks documents
There are two ways available for providing find and replace text information.
- You can enter one pair of find and replace text in the two fields on the left.
(Leave the Find Text field empty to search for all text and press Start Batch)
- The second method is to provide a list of multiple pairs of find and replace text in an Excel file.
Changes made to the files cannot be undone!
Make sure your files are backed up.
There is an important difference between the two operating modes: Preview and Replace.
Preview mode searches for text and displays the found text and the new text as will be modified but does not save any modification to the documents.
This mode allows to see how and what text will be modified without actually modifying anything.
The Replace mode also shows the old text and the new text but also saves the modifications to the documents.
-After a preview, each matching text item is listed and selected for replacement, but user is given the option to unselect some of the text items before the batch replacement starts.
The results tab gives a detail report of the changes to each document and text item. Each text item is listed on a separate line which shows the file name and its path, the old text and the new text.
How to Export Flat Pattern in batches
Select the file type to export: DWG or DXF, or both and the desired options: Remove Bend Lines, Add Configuration Name Suffix and Add Sheetmetal Thickness Suffix.
Then start the batch.
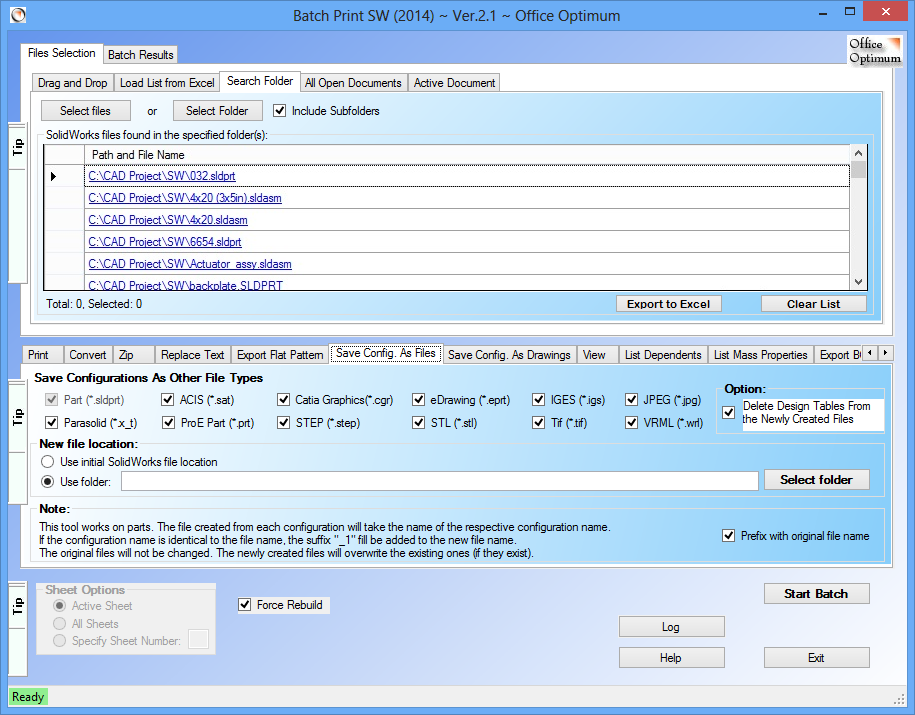
How to Save Configuration As Individual sldprt Files or as Other File Types in batches
This tool works on parts. The file created from each configuration will take the name of the respective configuration name.
If the configuration name is identical to the file name, the suffix "_1" fill be added to the new file name.
The original files will not be changed.
The newly created files will overwrite the existing ones (if they exist).
The other supported file types are: ACIS (*.sat), Catia Graphics(*.cgr), eDrawing (*.eprt), IGES (*.igs), JPEG (*.jpg), Parasolid (*.x_t), ProE Part (*.prt), STEP (*.step), STL (*.stl), Tif (*.tif) and VRML (*.wrl).
How to Save Configuration As Drawings SLDDRW File Types in batches
This tool works on parts. Their respective drawings must exists in the same folders.
The file created from each configuration will take the name of the respective configuration name. If the configuration name is identical
to the original drawing name, the suffix "_1" fill be added to the new file name.
The original files will not be changed. The newly created files will overwrite the existing ones (if they exist).
How to Save a View to Image Files in batches
The views can be saved to JPEG (*.jpg) or to Tif (*.tif) file formats.
How to List all the Dependent Files
You have the option to list the first level or to traverse down into all dependent files.
This tool does not list Library features.
Suppressed components are recognized and listed as a dependent file.
Once the list is created, you can export it from the Results tab to Excel by selecting the desired lines and pressing Ctrl + C or by pressing the ‘Export to Excel’ button.
How to List Mass properties of visible and hidden components in batches
Here you have to option to include Mass Properties Of Hidden Bodies.
How to Generate BOM from Assembly
This tool works on assemblies and drawings with table-based Bill of Materials.
Once the list is created, you can export it from the Results tab to Excel by selecting the desired lines and pressing Ctrl + C or by pressing the ‘Export to Excel’ button.
How to change Assembly Component Visibility in batches
Changes made to the files cannot be undone!
Make sure your files are backed up.
How to List drawing notes in batches
Once the list is created, you can export it from the Results tab to Excel by selecting the desired lines and pressing Ctrl + C or by pressing the ‘Export to Excel’ button.
The Excel file will display the complete text notes.
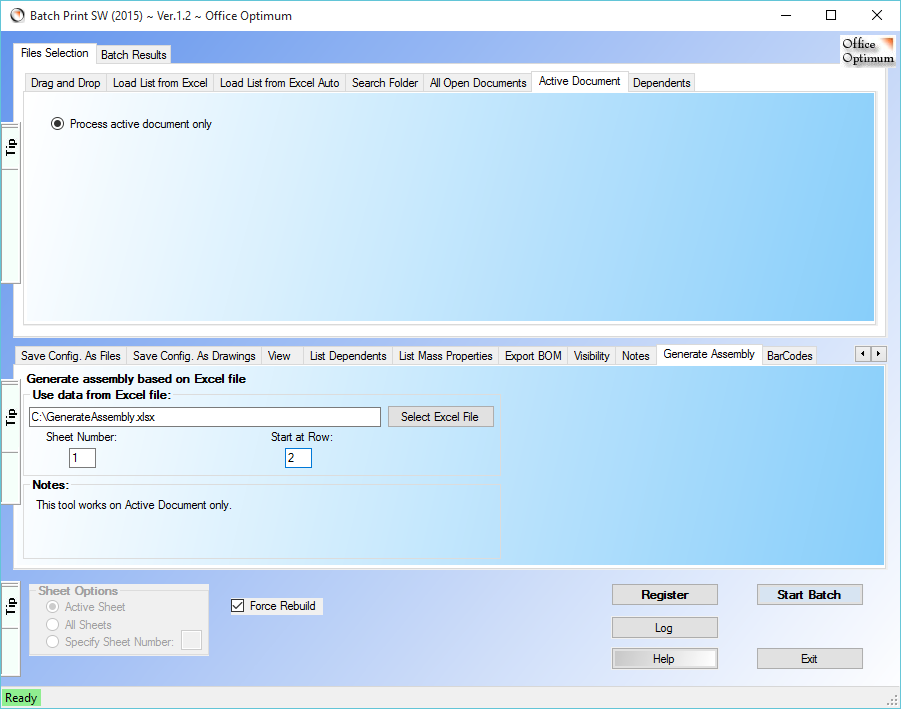
How to Generate an Assembly based on a list of parts from an Excel file
Start SolidWorks with an assembly document.
Open an Excel file and list the paths and names of SolidWorks part files you want to include in the assembly along with their coordinates.
Launch Batch Print SW, go to the Active Document mode, Generate Assembly utility.
Click on the Select Excel File button to select the above file and enter the Sheet Number and Start at Row values as per your needs.
Press Start Batch.
Returning to SolidWorks, you should see your new assembly having the parts specified in the Excel file.
The following two images show an example of the Excel file and the program’s interface.
How to generate and insert Barcodes in SolidWorks documents (or elsewhere in any other document type).
Select the BarCodes tab on the program interface, then enter the text to encode and select a barcode type.
You have the option to select among a few linear barcodes (one dimensional) or matrix barcodes (2D barcodes) like PDF417 or QR code.
Next, click on Copy to Clipboard button.
Paste the barcode image in a SolidWorks document or in an Excel or Word document.
* Speed varies depending on factors like file size, network and
computer speed.
- Pad file location:
https://www.officeoptimum.com/SW/BatchPrintSW/BatchPrintSW2023Setup.xml
https://www.officeoptimum.com/SW/BatchPrintSW/BatchPrintSW2022Setup.xml
https://www.officeoptimum.com/SW/BatchPrintSW/BatchPrintSW2021Setup.xml
https://www.officeoptimum.com/SW/BatchPrintSW/BatchPrintSW2020Setup.xml
https://www.officeoptimum.com/SW/BatchPrintSW/BatchPrintSW2019Setup.xml
https://www.officeoptimum.com/SW/BatchPrintSW/BatchPrintSW2018Setup.xml
https://www.officeoptimum.com/SW/BatchPrintSW/BatchPrintSW2017Setup.xml
https://www.officeoptimum.com/SW/BatchPrintSW/BatchPrintSW2016Setup.xml
https://www.officeoptimum.com/SW/BatchPrintSW/BatchPrintSW2015Setup.xml
https://www.officeoptimum.com/SW/BatchPrintSW/BatchPrintSW2014Setup.xml
System requirements
SolidWorks 2009 or later
Operating System: Windows 7, Windows 8, Windows 10 (32 or 64 bit)
Microsoft Excel
|
